Sunday, November 3, 2013
DIY! Necklaces Holder DIY Video!
Necklace Holder DIY
I would like to share with you this DIY! It's very easy and simple to make. I actually have created a video for it. It's not long it's under 2 minutes. Let me know what you think! Have a great Monday!
Materials:
1. Cork Board, 2. Acrylic Paint, 3. Paint Brush, 4. Ruler, 5. Tacks
Directions:
1. Paint the Frame if it wasn't already painted. This board was
already painted so It was one less step to do.
2. Paint the Cork Board itself with a bright color. I painted it white.
3. Apply 2 or 3 coats to give it a nice clean look.
4. Measure 2 inches and place the tacks at these two points.
5. Measure one inch in between each set of tacks. Apply this to
the whole board.
7. Place your Necklaces on the board and enjoy an organized tangle
free necklaces.
Friday, November 22, 2013
Fox Design Sweater DIY!
Fox Design DIY!
Hello Friends,
Today I will share with you how to make a fox design sweater diy. You can watch the video for the steps on how to make it. It's very easy. You can use any sturdy fabric you like. I used Felt. You can sew it directly or you can use fabric glue to glue it to your sweater. I hope you enjoy this video. Have A Sweet Weekend!
Tuesday, October 8, 2013
Fall Flowers Head Band DIY!
Hello Friends,
Today
I decided to post this Do It Yourself Flowers Head Band. It's actually
very simple and easy to make. It's perfect for the fall season since the
flowers' colors I chose are very fall colors. Let me know what you
think! Have A Nice Day!
Materials:
1. Orange/Red color
flowers.
2. Black Ribbon
3. Glue Gun
4. Scissors
Directions:
1. Measure the needed ribbon by surrounding it around your head and leaving enough space to be able to tie it.Then cut it.
2. Cut one flower at the end of the stem.
3&4. Remove the plastic base that is holding the flower.
5&6. Heat your glue gun & Apply it at the back of the flower.
7. Place the flower at the middle of the ribbon.
8. Repeat steps 1through 7 six times. Three times on each side of the middle flower.
That's it! Tie it around your head and rock it :) I hop you enjoyed this DIY!
Friday, August 23, 2013
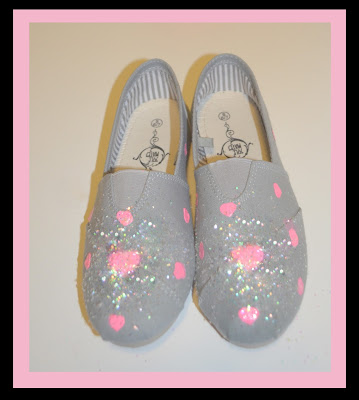
Sneakers Hearts Design DIY!
Sneakers DIY
Materials:
1. Sneakers
2. Fabric paint (pink & White)
3. Heart stencils
4. Brush
5. Scissors
6. White glitter
7. Fabric pen
8. Spray glue
9.Clear tape


1. Think of the design you would like to achieve.
2. Place the stencil where you want it to be, add tape around it to hold it down.
3. Mix the colors you have to achieve the color you want. I had dark pink, so I added white paint to it to make it a lighter shade of pink. Then apply the paint using the brush on top of the stencil like you see in the picture above.
4. Apply about 2-3 coats.
5. Remove the stencil with the tape, and you will get the shape you were looking for. In this case a heart shape design.
6. Repeat the same process as above with a smaller heart stencil around the sneakers
7. Let it dry for about 3 hours.
8. Spray the Glue adhesive spray on the front of the sneaker then sprinkle the white glitter all over it, and let it dry for a few minutes.
That's it! I hope you liked this DIY! Have A Sweet Day!
Wednesday, August 7, 2013
Bow Hair Clip DIY!
Materials:
2. Hot Glue
3. Scissors
4. Hair Clip
Directions
1. Cut your piece of fabric into a rectangular shape
2. Fold the top of the fabric into the middle of it
3. Fold the bottom on top of the top part of the fabric
3. Fold the bottom on top of the top part of the fabric
4. Fold the right side into the middle of the fabric
5. Apply hot glue into the end of the right side
6. Fold the left side of the fabric to the middle of it
on top of the right side and secure the two ends
with hot glue.
with hot glue.
7. Flip the fabric and pinch it in the middle.
Then apply hot glue to secure it.
8. Cut another thin piece of fabric and fold
the bottom to the middle of the fabric
the bottom to the middle of the fabric
9. Fold the top to the middle of the fabric
10. secure with hot glue and cut it
11. Wrap the longer piece on top of the
middle of the bow
middle of the bow
12. Secure with hot glue
13. Apply hot glue to the back of the bow and
add the hair clip.
That's it! I hope you enjoyed this DIY and Have a Sweet Day!
Friday, July 26, 2013
Clay Jewelery DIY!
Today's post is about
making Jewlery by using
oven bake clay.It's fun
& easy DIY to make.You
can be creative and mold
the clay into whatever
shape you like.
making Jewlery by using
oven bake clay.It's fun
& easy DIY to make.You
can be creative and mold
the clay into whatever
shape you like.
Materials:
1. Oven Bake Clay
2. Hot Glue
3. Acrylic Colors (optional)
3. Plastic knife
4. Safety pin
5. Sparkly Nail Polish
6. Stencils of the shape you desire
(optional if you can't shape what you want)
7. basic ring
8. Necklace/ Chain
Directions:
Start by shaping your clay in the desired shape. I made a heart pendant for a necklace and a flower for a ring. For the heart I
just molded the clay in the shape of a heart using a plastic knife. If
you can't do it, just print a heart on a piece of paper, cut it out,
then place it on top of the flattened clay and use it as a reference to
cut around it until you achieve the heart look. Once you have your
heart pendant, make two holes on top of the heart, we do this to be able
to insert a chain through the pendant. Bake the pendant according to
the directions on your clay which is usually 275 F degrees for 15
minutes. Once the pendant is cooled. Start painting if you would like,
or you can customize it as you wish. I painted it red and used a
stencil with the letter "N", and then used sparkly nail polish to give
it a finished look. Insert the chain through the holes and now you have
your own hand made customized pendant. For the flower I
shaped it by molding little pieces of clay into tear drops, then I
attached them together to form the flower. After that I molded a
circular flattened piece of white clay to put it in the middle. I baked
the flower and attached to the a ring using hot glue. That's it. I hope
you enjoyed this DIY. Have a Sweet Day!
4 comments:
Sunday, July 14, 2013
DIY Sandals
Hello Friends!
I bought these sandals on sale yesterday but I didn't really like the gold color on these sandals. So I decided to add some embellishments to make it look better. I went to Micheal's and I found some little tiny black flowers and some very tiny black acrylic jewels. They were both very inexpensive. I ended up getting both for $3.50 after the discount.This is a very easy DIY.

Materials needed:
1. Sandals
2. Embellishments you can choose from a
wide variety, I got the flowers and acrylic
jewels.
3. Glue Gun
Directions:
1. Decide where you want to add the
embellishments. Lay it on top of the
Sandals and try different ways of placing
them until you achieve the desired look.I
decided to put the flowers on all the golden
straps. However I added the jewels in
between each flower on the horizontal
strap and at each end of the vertical strap.
strap and at each end of the vertical strap.
2. Grab each piece and add hot glue to the
back of it and then stick it in its place. Be
careful with the little jewels because you
can burn your hands like I did. You can
use tweezers to place them if you like.
3. Continue step number 2 until your design
is complete. I really like how it looks now.
Enjoy making your own.
Have a Sweet Day!
July, 9th 2013
Studding Clothes DIY!
I've always liked the studs trend but I couldn't find the designs I like. So I decided to make my own.
I went to the craft stores and I searched for studs but I couldn't find any. So I went online and I purchased some off of eBay. You can choose from a wide variety of studs shapes. I like the pyramid shape.
 Materials for this DIY:
1. Studs
2. butter knife
3. Clothes item
(T-shirt, shirt, Jacket, shorts, or pants)
How to stud?

1. lay out the design you want to add to your clothes. Also Figure out where you want to add it, it can be on the shoulders, the pockets, the collar, etc..
2. Start studding by inserting each stud through the clothes item, then using the knife, you can fold the pointy edges of the stud from inside.
3. Continue the second step until
the design you desire is achieved.
Wear the item and enjoy your own studding design...
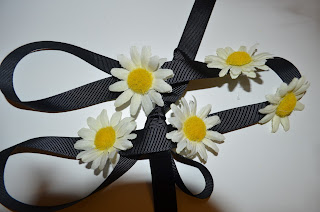
Flowers belt/headband DIY!
Hello there!

Since summer is here, I've decided to make
some styling accessories with flowers. So
I came up with this DIY.
I made a belt that can also be used as a head band. It's super fast and easy to make.
Materials needed:
 1. Flowers of your choice
 2. Ribbon (I used black ribbon)
3. Hot glue
4. Scissors
Directions:
1. Cut the flowers from its stem using the scissors
2. Measure your ribbon depending on your waist line, put it around your waist and allow enough distance to be tied, then cut it.
3. lay the flowers on the ribbon and plan where you want them to be.
4. Glue the flowers using the hot glue, and let it dry for a few minutes
That's it. Enjoy making your own! You can style it with a black or white dress. Or you can wear it as a head band with jeans and a t-shirt.
This belt was featured on one of my style looks here & here


No comments:
Post a Comment